Glute Bridge
Glute Bridge: A Powerful Glute Builder You Can Do Anywhere
If you want stronger hips, firmer glutes, and better lower-body control, this guide walks you through the glute bridge step by step. You’ll get clear form cues, smart progressions, and the most useful variations, from single-leg work to weighted sets.
Why This Exercise Feels Different
The glute bridge teaches true hip drive. That matters when you walk, climb stairs, run, or lift. Many people rely on the lower back without noticing. This move helps shift work back to the glutes, so your hips feel steadier and your movement feels cleaner.
What You’ll Learn Here
You’ll learn what a glute bridge is, how to do it with strong form, and how to progress it safely. You’ll also get clear guidance for banded, dumbbell, barbell, marching, and single-leg variations, plus a simple training plan that fits home and gym workouts.
Glute Bridge Exercise Overview
Think of this section as your quick reference. If you like details, keep reading. If you want a fast snapshot, use the table first. It tells you what the glute bridge trains, what equipment you can use, and what to watch for, so you get results without guessing. The goal is simple. Strong glutes, stable hips, and smooth control, even if you train at home.
| Category | Details |
|---|---|
| Main movement | Glute bridge exercise (hip extension) |
| Primary goal | Glute strength, hip stability, better posture support |
| Where it fits | Warm-up, accessory lift, glute growth, control work |
| Equipment options | Bodyweight, banded glute bridge, dumbbell glute bridge, barbell glute bridge, glute bridge machine |
| Common upgrades | Glute bridge hold, glute bridge march, single leg glute bridge, weighted glute bridge |
| Top form cue | Ribs down, squeeze glutes, keep hips level |
| Most common mistake | Over-arching the lower back at the top |
Tip: If you want the glutes to work harder without more weight, slow the lowering phase and add a brief pause at the top.
What Is a Glute Bridge?
Many people ask, “what is a glute bridge” because it looks almost too simple. You lie on your back, bend your knees, place your feet flat, and lift your hips by squeezing your glutes. Your shoulders stay on the floor. Your hips rise until your body forms a straight line from shoulders to knees. Then you lower with control and repeat. The goal is not height. The goal is tension in the glutes and steady control through the hips.
This move is popular because it is friendly for many bodies and easy to scale. You can do it with bodyweight for learning. You can add a band for better hip control. You can place a dumbbell or barbell on the hips for strength and growth. You can even choose a glute bridge machine in a gym. No matter the setup, the main idea stays the same. Strong glutes drive the movement, while the core keeps the ribs and pelvis steady.
Glute Bridge Muscles Worked
The glute bridge muscles worked begin with the gluteus maximus. That is your main hip extender and the muscle you want to feel. The gluteus medius helps keep the hips level and stops the pelvis from rolling side to side. The hamstrings assist the lift, but they should not dominate. Your core supports the position by keeping your ribs from flaring and your spine from over-arching. A good rep feels strong and controlled, not strained.
If you feel hamstrings cramping, the most common fix is foot placement. Move your feet slightly closer and slow the reps. If you feel pressure in the lower back, stop lifting so high and bring the ribs down. Another fix is to squeeze glutes before you lift. That sets the movement pattern and keeps the spine calm. When the form is right, you feel a solid glute squeeze at the top, then steady tension as you lower.
Glute Bridge Exercise: Perfect Form That Actually Works
Start on your back with knees bent and feet flat. Keep feet about hip-width apart and toes pointing forward or slightly out. Rest your arms at your sides. Take a slow breath and gently tighten your core, like you are preparing for a light tap to the stomach. Now press through your heels and lift your hips by squeezing the glutes. Think about driving the hips up, not pushing the ribs up. At the top, your body should look like a clean line from shoulders to knees.
Pause for one second at the top and squeeze hard, then lower slowly without dropping. Stay controlled. Avoid rushing, bouncing, or flaring the ribs. A simple cue is “ribs down, hips up, glutes tight.” If your knees drift inward, press them gently outward and keep your feet planted. If your feet slide, use a stable surface. This is the base that makes every variation stronger, even when you add weight.
Glute Bridge Hold: The Best Way to Feel Your Glutes
A glute bridge hold is a pause at the top that keeps the glutes under constant tension. Many people do fast reps and never own the top. The hold changes that. You lift, squeeze, and stay steady while breathing. Your ribs stay down and your hips stay level. You should feel the glutes working like a steady clamp. This is a great way to improve control, especially if you struggle to feel glutes during squats or lunges.
Start with 15 to 20 seconds and build toward 30 to 40 seconds. Keep the neck relaxed and avoid pushing the hips too high. If you want it harder, add a light band or place a light dumbbell on the hips. The goal is not suffering. The goal is clean tension and steady breathing. Many people use this before leg day because it helps the hips feel stable and ready.
Glute Bridge March and Marching Glute Bridge
The glute bridge march, also called a marching glute bridge, adds a stability challenge. You lift into a bridge and hold it steady. Then you lift one foot off the floor like a slow march, set it down, and switch sides. Your hips should not twist. If they twist, slow down and make the march smaller. The goal is calm control, not speed. This variation teaches the hips to stay level under single-leg demand.
It works well for runners, athletes, and anyone who feels shaky in lunges or step-ups. Start with 6 to 10 marches per side. Keep your ribs down and glutes squeezed the whole time. If you want more challenge, add a band above the knees. If you want to keep it easy, reduce the range and do fewer reps with cleaner form. Over time, this variation builds better hip control that carries into everyday movement.
Single Leg Glute Bridge and Single-Leg Glute Bridge
The single leg glute bridge is a strong way to build one-side strength and expose imbalances. Set up like a normal bridge. Lift slightly first, then extend one leg and keep it off the floor. Drive through the planted heel and lift with control. Your hips should stay level and square. If one side drops, reduce the range and focus on keeping the pelvis steady. This is not about big reps. It is about clean reps.
If hamstrings cramp, bring the planted foot closer. If the lower back takes over, stop lifting so high and brace more gently. Start with 6 to 10 reps per side and use a slow tempo. A short pause at the top helps you feel the glutes even more. Once you can keep the hips level for the whole set, this variation becomes a powerful tool for strength, stability, and better movement.
Dumbbell Glute Bridge, Weighted Glute Bridge, and Glute Bridge With Weight
A dumbbell glute bridge is a simple home upgrade. Place a dumbbell across your hips and hold it steady with both hands. Use a towel or pad for comfort. This turns your set into a weighted glute bridge and helps you build stronger glutes without complex setup. Keep the same form. Ribs down, steady hips, strong squeeze at the top. Choose a weight you can control for 8 to 15 clean reps.
The glute bridge with weight works best when you slow the reps and pause at the top. That keeps tension on the glutes. Avoid bouncing off the floor. Lower with control and keep your feet planted. If you want more challenge without heavy loading, add a band above the knees and press out gently. This combination builds strength and glute growth while keeping movement stable and easy to repeat week after week.
Barbell Glute Bridge: Heavy Strength With Solid Control
The barbell glute bridge is a gym-friendly option when you want heavier loading. Set the bar across your hips with padding. Keep your shoulders on the floor, feet planted, and core gently braced. Drive through the heels and lift by squeezing the glutes. Pause at the top, then lower with control. The best reps feel powerful but clean, with the spine staying calm and the hips doing the work.
Avoid chasing height. Stop when your body is straight from shoulders to knees. If you lift higher, the lower back may arch. Start with moderate weight and build slowly. Many lifters get better results by adding a longer pause and slower lowering instead of rushing heavier plates. If you feel the bar shifting, adjust foot position and keep both knees steady. With practice, this becomes a strong glute builder that supports heavier lower-body training.
Banded Glute Bridge: Better Hip Control and Stronger Glute Feel
A banded glute bridge uses a loop band above the knees. The band tries to pull your knees inward, so your glutes must keep them stable. This is one reason people feel a stronger glute pump with bands. The key is gentle outward pressure, not pushing the knees wide. Keep your feet planted, ribs down, and hips level. Lift smoothly and squeeze at the top.
This variation works well in warm-ups and high-rep finishers. Try 12 to 20 reps and keep tension in the band the whole time. If the band is too strong and your knees collapse, use a lighter band. Clean control always beats forced reps. You can also add a brief top pause or a bridge hold to make the set more intense without extra weight. Over time, this can improve knee tracking and hip stability in many lower-body movements.
KAS Glute Bridge: Short Range, Big Burn
The KAS glute bridge keeps you near the top half of the movement. You do not lower all the way down. This keeps constant tension on the glutes and creates a strong burn. It also helps you build a better mind-muscle connection. The setup is the same as a standard bridge. Lift to the top, then lower only a few inches and come right back up. Keep it smooth and controlled.
Aim for 15 to 25 reps with steady breathing. Avoid bouncing because that reduces tension. If you feel it more in your quads, your feet may be too close. If you feel it more in hamstrings, your feet may be too far. Adjust slightly until the glutes do most of the work. Many people love this as a finisher after weighted sets. It helps you leave the workout with a clear glute pump and better control.
Glute Bridge Machine: When It Can Help You Train Better
A glute bridge machine can be useful because it offers stability and a guided path. That makes it easier to load the glutes without balancing a barbell. It can also be helpful if you want consistent reps with clear progression. Still, the machine does not replace good form. You still want ribs down, hips level, and a strong squeeze at the top. The goal stays the same: glutes drive the movement.
Adjust the machine so your feet feel solid and your knees track comfortably. Press through the heels and lift with control. Pause at the top and lower slowly. Many people get better results using moderate weight with perfect reps, rather than max weight with messy reps. If you want a strong pump, use higher reps. If you want strength, use lower reps with longer rest. Either way, stay consistent and progress in small steps.
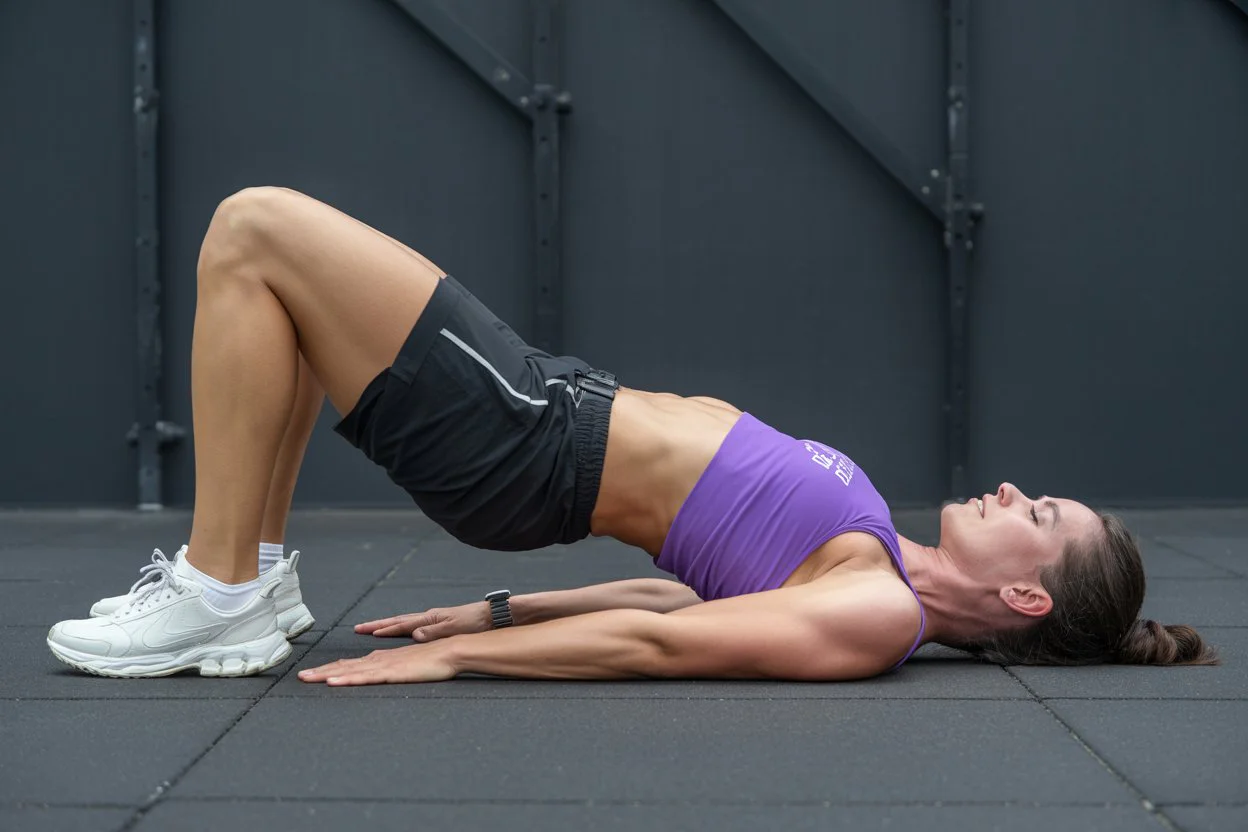
Glute Bridge Exercise Illustration: Easy Way to Check Your Form
A glute bridge exercise illustration usually highlights alignment. Shoulders stay down, ribs stay down, and the hips rise until the body forms a clean line. Knees stay over the feet and do not cave inward. If you want to check your form quickly, record yourself from the side with your phone. Look for a smooth lift, a calm spine, and a steady top position. This simple check can fix problems you do not notice during a set.
If you see ribs flaring, reset and brace gently. If you see the pelvis twisting, slow down and reduce range. If knees drift inward, add a band and press outward slightly. If feet slide, improve traction. These fixes are small, but they change the quality of every rep. When the shape is right, the glutes do the work. That is what makes the exercise worth doing, even if it looks simple.
Glute Bridge Exercise Video: What to Look For in a Good Demo
A glute bridge exercise video can help you learn faster, but only if the demo shows clean reps. Watch the top position. In a good demo, the ribs stay down and the hips rise smoothly. You should not see bouncing, fast half reps, or over-arching. A strong demo also shows slow lowering and a brief pause at the top. Those details often decide whether the glutes feel engaged or not.
When you follow a demo, match the tempo. Slow reps build better control. Add a pause. Focus on what you feel. Glutes should feel like the main driver. If the hamstrings cramp, bring feet a bit closer. If the lower back tightens, reduce lift height and keep ribs down. The best demo is the one that helps you move with calm control, steady hips, and strong glute tension every rep.
Glute Bridge vs Hip Thrust: Which One Should You Choose?
The glute bridge vs hip thrust question comes up often. Both train hip extension and build strong glutes. The main difference is range of motion and setup. A hip thrust uses a bench, which usually increases range and peak tension at the top. Many people can load hip thrusts heavier. The glute bridge stays on the floor, which can feel more stable and easier to set up. Both can work if form and consistency are solid.
If you train at home, bridges can build strong glutes when you add pauses, bands, and weight. If you train in a gym and want heavier loading, hip thrusts can be a great main lift. Many routines use bridges as a primer, then hip thrusts for heavier sets. When deciding hip thrust vs glute bridge, choose the movement you can do without pain and with steady progress. A clean plan repeated weekly beats switching exercises every few days.
Common Mistakes That Reduce Glute Bridge Results
The biggest mistake is over-arching the lower back at the top. This happens when people chase height instead of tension. The fix is simple: keep ribs down and stop lifting when the body forms a straight line. Another common issue is rushing reps and bouncing off the floor. That reduces tension and makes the set feel easier than it should. Slow reps with a top pause build better control and better results.
Foot placement matters too. If feet are too far, hamstrings may cramp. Move them closer and squeeze glutes first. If feet are too close, quads may take over. Move feet slightly forward and drive through heels. Knee collapse is another issue. If knees cave inward, use a band and press outward gently. These fixes are small, but they change the feel of the exercise right away and keep progress steady.
Glute Bridge Training Plan Table (Home and Gym)
This table gives you a simple way to train without overthinking. Pick a goal and match the variation. If you are new, start with bodyweight and learn clean form. If you want growth, add weight and use a pause. If you want stability, add marching and single-leg work. Keep the sets consistent for a few weeks and track progress. Small improvements each week add up faster than people expect.
| Goal | Best Variation | Sets | Reps / Time | Best Tip |
|---|---|---|---|---|
| Beginner strength | Glute bridge exercise (bodyweight) | 3 | 10–15 | Pause 1 second at the top |
| Glute activation | Banded glute bridge | 2–3 | 12–20 | Keep knees steady |
| Hip stability | Marching glute bridge / glute bridge march | 2–3 | 6–10 per side | Hips stay level |
| Single-side control | Single leg glute bridge | 3 | 6–10 per side | Slow tempo, no twisting |
| Muscle growth | Dumbbell glute bridge | 4 | 8–15 | Slow lower + top pause |
| Heavy strength | Barbell glute bridge | 4 | 6–10 | Stop at straight-line top |
| Finisher burn | KAS glute bridge | 2 | 15–25 | Short range, nonstop tension |
| Machine option | Glute bridge machine | 3–4 | 8–15 | Controlled reps, steady hips |
Simple weekly structure: 2–4 sessions per week. Mix a weighted day and a control day. Keep the movement clean and consistent.
Final Takeaway: Build Strong Glutes Starting This Week
The glute bridge is simple, but it is not basic. It builds strong glutes, steadier hips, and better lower-body control when you do it with clean form. Focus on ribs down, hips level, and a strong squeeze at the top. Then progress with a band, a dumbbell, a barbell, or a machine. You do not need fancy setup to improve. You need consistent practice and quality reps that keep tension where it belongs.
If you want a clear plan, start with three sessions per week. Do controlled bridges with a top pause, add a bridge march for stability, and include weighted glute bridge sets for strength. Track your reps and add small improvements weekly. If you stay consistent, you will feel stronger hips and a better connection to the glutes in other exercises. Stick with it for four weeks and you will notice the difference in daily movement and training.
FAQs
These answers are written to be clear and practical. If you want faster progress, focus on form first. Once form feels strong, add a simple progression like a pause, a band, or a small weight increase. Keep it steady, and let the results build week by week.
Tip: If you want, tell me your equipment (band, dumbbell, barbell, machine), and I can format a 4-week plan inside this same design.